Happy Canada Day to my fellow Canadians. And, welcome to the July release for A Colorful Life Designs.
I am sure you will enjoy this release, with a lot of fun stencils. The design team has been hard at work to bring you cards made using these stencil. They are all beautifully designed. For my card above I am using Layered Arches. I applied Opaque Ranger Texture Paste to the stencil. Once complete I removed the stencil and cleaned it. When the paste was dry I sponged on a few colours to the bricks.
In my mini Misti I stamped the Mountie (AALL and Create #187) using Memento Ink in Tuxedo Black and proceeded to colour using Copic markers. Once complete I fussy cut the Mountie and attached her using foam squares. I then stamped the sentiment using VersaFine Clair ink in Nocturne.
This card is "Happy Face" and I loved making it. The stencils I used are Portal, and Smiley Face along with distress oxide inks in Squeezed Lemonade, Tumbled Glass, Twisted Citron and Worn Lipstick. I then stenciled the Smiley Face using several passes of the Squeezed Lemonade.
To finish up I added a few enamel dots in the same colours I used to stencil, along with the sentiment strip on a Pink card base.
Here is "Hello". I love this card, the Viewmaster stencil design is beautiful. I added a second stencil being Circle Ring. The colours are Pinkfresh inks in Coral Reef, Passion Fruit, Berrylicious and Candy Apple.
Using gold mirror card stock I die cut the hello die, then cut three more pieces from Neenah cardstock, gluing them together with the gold mirror piece on the top.
On the inside of this card I used the Circle Ring stencil to add colour and design, just waiting for a sentiment.
This is "Thank you" where I am using the "Stacked Blocks" stencil. For colour I opted to use inks from Pigment Craft Company using Himalayan, Quince and Fig. When complete I attached an Orange mat, and affixed to a brown cardbase.
In my mini Misti I stamped the Colorado Craft Co. Thoughtful Bird image and die cut it with the coordinating die. I then coloured using Copic markers in YR02, YR65 on the bird; E97 for the ribbon, and for the shadows on the bird E99; YR16, YR18 were used on the purse; and E11 for the bird beak.
I attached the bird and purse using foam squares, then in my mini Misti I stamped the sentiment using Memento Ink in Rich Cocoa.
This card is using the "Blowout" stencil, and on the inside I have used the Amazing Stamp set. For the stenciling I used Pinkfresh inks in Marigold, Blue Jay and a bit of Sapphire. The mix of the Marigold and Blue Jay gave me the green centre "Star", where for a bit of bling I added sparkle enamel dots.
I should have taken a picture of the inside, and if I remember tomorrow I will do that.
This fun stencil is called "Doodle Loops". Isn't it great? For colour I used Pink Fresh inks again in Mint, Meadow, Emerald City and Evergreen around the edges.
In the centre using the Evergreen Ink I stamped the sentiment from the Amazing Stamp set. For some glam I added Pinkfresh gems in Ombre.
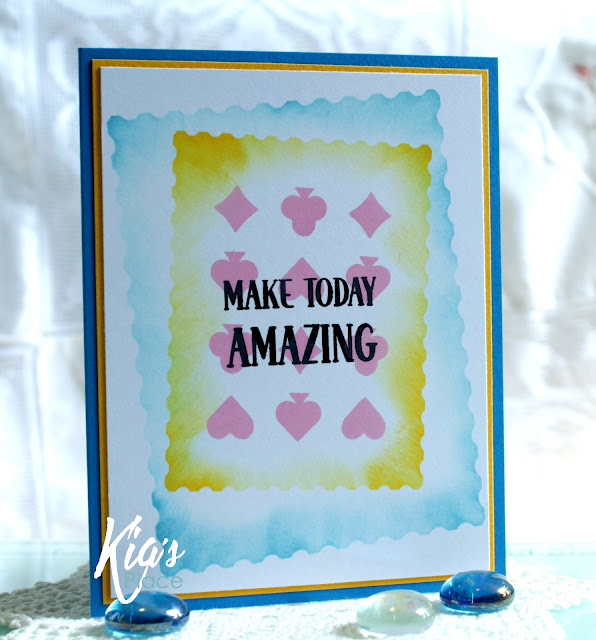
Here I am using three stencils being Suits, Marvelous Masks Postage. My colours are distress oxide inks in Broken China, Mustard Seed and Kitsch Flamingo. For my card base I used a Gina K Design card base in Blue Raspberry then matted with Wild Dandelion and adding my stenciled piece.
To finish up my card I stamped the sentiment using VersaFine Clair ink in Nocturne.
For my final card I am using the "Messy Harlequin" stencil. To colour I used Candied Apple Distress Oxide, along with Black Soot Distress Oxide inks. I then applied a Transparent Gloss through the stencil and put the piece aside to dry.
I searched Etsy looking for a Harlequin type digital image and found this "Clown" by The Octopode Factory which I printed and coloured using Copic markers. I matted the Harlequin piece with Gina K Design Black Onyx card stock, then affixed the piece to my Neenah card base.
I then attached the "Clown" using foam squares and in my mini Misti I stamped the WooHoo! using VersaFine Clair ink in Nocturne from the Amazing Clear Stamp set.
To finish up I added a few sparkle enamel dots.


what you did with that brick arch way is just fabulous Kia, fun cards :)
ReplyDelete